Using TortoiseGit with Beanstalk
Setting up your Beanstalk repository with TortoiseGIT is easy. Before you start pushing changes to your Beanstalk repository, you need to make sure TortoiseGIT is installed and that you have setup SSH keys correctly (optional) in order to access your Git repository.
In this article we will show you how to install TortoiseGit, clone a Beanstalk repository, add a file to it, do a commit and do a push.
Installing TortoiseGit
Before installing TortoiseGit, you need to install Git on your computer. To install Git, check out this article:
This article covers installing Git and using OpenSSH to access it, Git's default SSH client.

Clone Beanstalk repository
Now that you have installed Git, you can clone your existing repository from Beanstalk.
To clone your Beanstalk repository, go to your account, and then to the repository you created. The url to your repo will be in following formats depending on if you will be using SSH keys or HTTPS:
https://accountname.git.beanstalkapp.com/reponame.git
git@ACCOUNTNAME.beanstalkapp.com:/REPOSITORYNAME

The next step is to copy the Repository URL. This is the url of the repository which is required for TortoiseGit to download the repository to your computer.
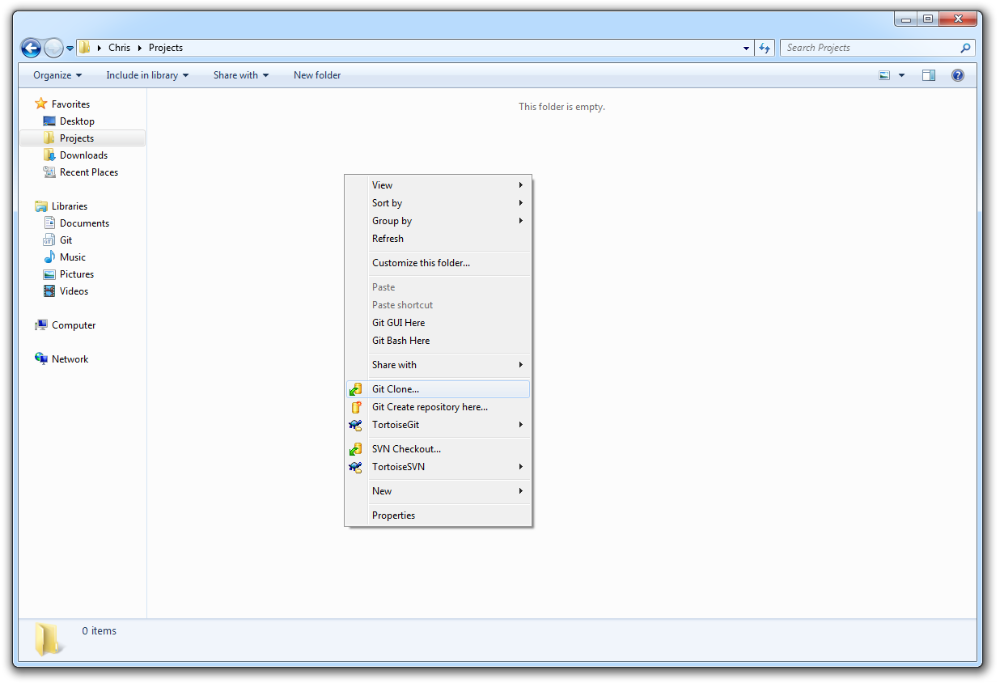
Then, in Windows Explorer, right click your mouse button, on a location where you would like to download (clone) your repository. In the screenshot, we have chosen "C:\Repository". A popup will show up where you will see the TortoiseGit actions. Choose Git Clone...
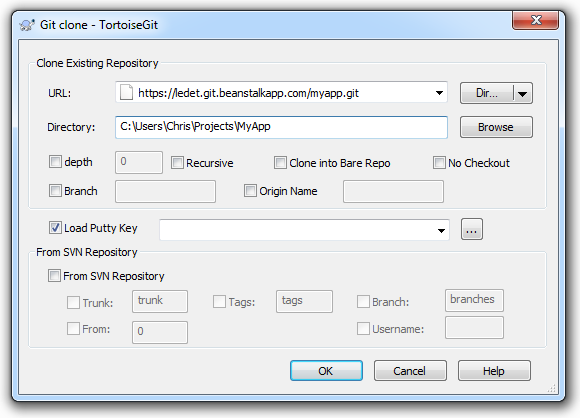
Now all you need to do is insert the repository URL and the folder where you would like your repository to be downloaded.
When the clone is finished you will see the folders and files which can be found in your Beanstalk repository downloaded to your computer.
Adding a file to your repository
Now that we have cloned a Git repository we will add one file to it. To accomplish this you need to copy the file to that folder, right click on it to get the popup, and select TortoiseGit->Add from the menu. This tells Git that a new file is added and ready for commit.

Commit your file
After you have added a file to your repository, the file is still not uploaded to Beanstalk. In order to do this, right click anywhere in your repository folder and select commit from the popup menu.

After this, you will see a TortoiseGit window which will prompt you for entering a message. We highly recommend that you describe each commit and what has changed.

Pushing changes to your Beanstalk account
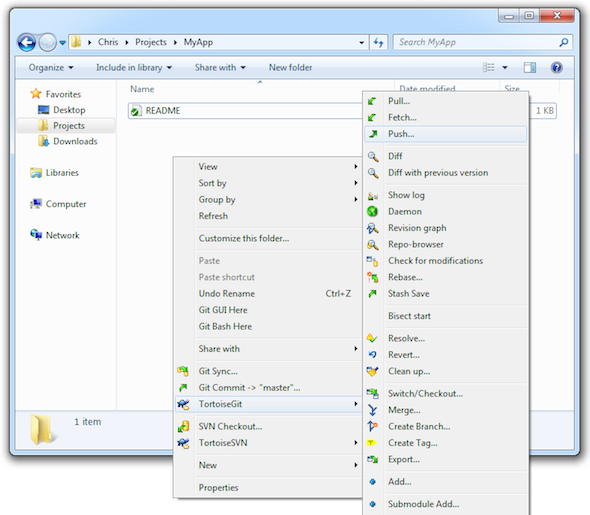
Now that you have committed the file you need to push it to Beanstalk. To push the changes, right click anywhere in your repository folder to get the popup, and select TortoiseGit->Push.. from the menu.
After this you will see a popup window which allows you to push changes to your repository. In this window you can select to which branch and remote you would like to push. We will leave the default settings, master branch and remote master in this example.

Well done! You have finished your first push to your Beanstalk account. In very similar way you can do more advanced things with TortoiseGit and Beanstalk.